SQL Azure Simple insert operations with Azure Functions
Created Date: 12th Feb 2020
Modified Date: 14th Feb 2020
Let's go serverless with Azure Functions.
The code for this tutorial can be found at: https://github.com/vijvipin/AzureFunctionConnectSQL
Simple as it sounds but took me some-time to get it finally working. Last two days read much Microsoft documentation and other blogs nothing was really working. Finally was able to nail down the problem area which was Nuget packages not loading.
Finally now lets start and make a simple Azure application which just inserts a single column in Azure SQL Database.
First things first: Let's create a SQL Function
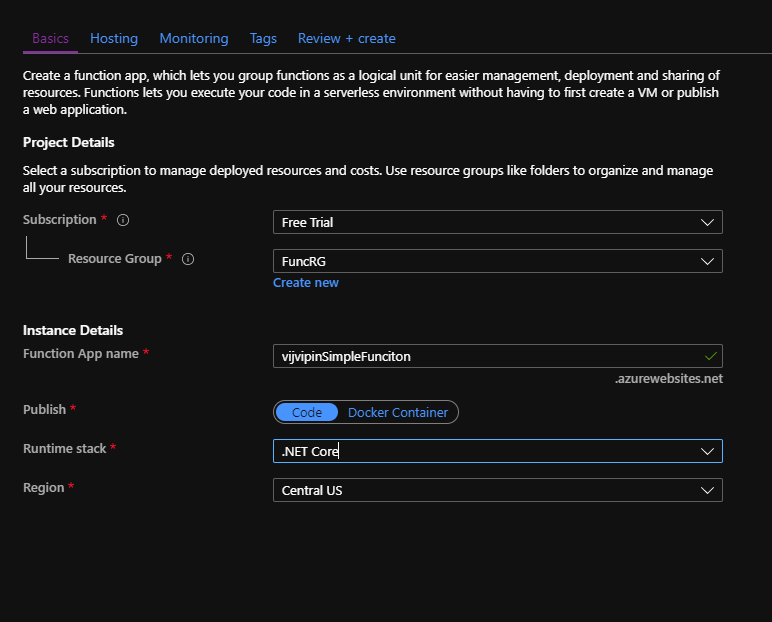
1. Go to All resource and select 'Function App'. Click + Add.

2. This will open following window, select your Subscription, Resource Group (Create one if not existing already). Enter a suitable Function App Name and Runtime Stack as '.Net Core'. You may choose other Runtime Stack that suits you. This example just focuses on connecting your function with the database.
3. And now for Plan Type - Choose Consumption. You can choose another option but I am keeping this simple.

4. Choose the values shown below. Its ok even if you choose 'No' for Enable Application Insights.

5. Provide Tags and now you can review your selection. Hit create.

6. Wait for some time and finally, your Function App is ready. Click the go-to resource.

7. Now let's create the core function. Following the steps in the following screenshots. Click + New Function as shown below

8. To keep things simple let's create the Function inside the Azure Portal Only. So select In Portal option and move ahead.

9. Choose 'Webhook + API'. Actually you know what this example will work simply fine with other types as well like 'Time' or 'Blob' as well. Hit create below.

10. And then you will be presented with the basic skeleton of the function ready. Microsoft is so kind. Saves a lot of time and gives you instant start. And this is fully functional code, not just dummy. Hail Microsoft.

11. You can go ahead and select 'Run'. You can see Status 200 OK on the right bottom. For now it's not important to go in more details what it does,

12. Now go to View Files and add a new file 'function.proj'.

12. Adding function.proj. Add the following code.

13. Now save the code and press hit and run. Now you can see Nuget packages getting loaded.

14. Guys the above step and new file added is quite important. Please mind the code I have given. Quite important. In many blogs, site, tutorials you will see them saying to add 'project.json' with the following code.This is not correct and will not work. The reason being the in latest azure the runtime version is 2 or 3. Refer the following images on how to check runtime versions.
So always use the code which I have given in Step 12.
{
  "frameworks": {
    "net46":{
      "dependencies": {
        "Dapper": "1.42.0",
        "System.Data.SqlClient":"4.1.0",
        "Microsoft.WindowsAzure.ConfigurationManager":"3.2.1"
      }
    }
   }
}
* this code is not to be used. Use the file name and code in step 12.
15. How to check version:


16. Ok So now we have our function ready. Some more code to be added but that will be done once the database is in place (Refer step 20 ahead). Let's create a quick database and also create a very small table in which we insert one record.
17. Create SQL Database and Server as shown below. I left most of the setting to default. Once the database is created, go ahead and create a tables

18. Create table. Use following:
create table blobfileInformation
(
fileFirstName varchar(100)
)
19. OK so now you have database and tables as well. We need a connection string to the database. Click 'Connection String' and copy the value given for ADO.NET. I have show connection string for my database. Go ahead and change the value for User ID and Password based on your settings.
Server=tcp:functestservr.database.windows.net,1433;Initial Catalog=functiontest;Persist Security Info=False;User ID=vijadmin;Password=Myadmin@235;MultipleActiveResultSets=False;Encrypt=True;TrustServerCertificate=False;Connection Timeout=30;


20. Now remember I mentioned in step 16 we need to make some more changes in the function code. SO let's do it. Open your run.csx and make the following changes. Once done go ahead the hit save and then run the code. Pay special attention to the new addition in header section where I have added:
using System.Data.SqlClient;
using System.Configuration;
#r "Newtonsoft.Json"
using System.Net;
using Microsoft.AspNetCore.Mvc;
using Microsoft.Extensions.Primitives;
using Newtonsoft.Json;
using System.Data.SqlClient;
using System.Configuration;
public static async Task<IActionResult> Run(HttpRequest req, ILogger log)
{
log.LogInformation("C# HTTP trigger function processed a request.");
string name = req.Query["name"];
string requestBody = await new StreamReader(req.Body).ReadToEndAsync();
dynamic data = JsonConvert.DeserializeObject(requestBody);
name = name ?? data?.name;
var connectionString = "Server=tcp:functestservr.database.windows.net,1433;
Initial Catalog=functiontest;Persist Security Info=False;User ID=vijadmin;
Password=Myadmin@235;MultipleActiveResultSets=False;Encrypt=True;
TrustServerCertificate=False;Connection Timeout=30;";
Initial Catalog=functiontest;Persist Security Info=False;User ID=vijadmin;
Password=Myadmin@235;MultipleActiveResultSets=False;Encrypt=True;
TrustServerCertificate=False;Connection Timeout=30;";
using(var connection = new SqlConnection(connectionString))
{
//Opens Azure SQL DB connection.
connection.Open();
var querytext = "insert into blobfileInformation (fileFirstName)
values ('DefaultFile')";
values ('DefaultFile')";
log.LogInformation(querytext);
using (SqlCommand cmd = new SqlCommand(querytext, connection))
{
// Execute the command and log the # rows affected.
var rows = await cmd.ExecuteNonQueryAsync();
//log.LogInformation($"{rows} rows were updated");
}
}
return name != null
? (ActionResult)new OkObjectResult($"Hello, {name}")
: new BadRequestObjectResult("Please pass a name on the query string or in the request body");
}
21. In above code, I am first creating the connectionString in which I am storing the connection string from step 19. Yeah I know not the best practice for production but for Demo it is OK.
22. Now go and check you Azure SQL database and Voilla you have a new entry in database table.

Hope you enjoyed the post.

Comments